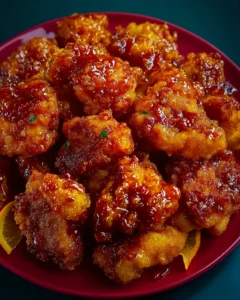
Orange chicken is one of the most beloved dishes in American-Chinese cuisine, known for its irresistible balance of sweet, tangy, and savory flavors. With golden, crispy chicken pieces coated in a glossy orange sauce, this dish has become a family favorite across the country. If you’ve ever wondered how to recreate the best orange chicken recipe at home, you’re in the right place. Not only will you learn how to achieve restaurant-quality results, but you’ll also discover practical tips for frying, sauce-making, and ensuring your chicken stays juicy inside while perfectly crisp on the outside.
This recipe is crafted with ingredients that are widely available in the U.S., making it both convenient and approachable. The cooking process combines classic Chinese techniques with a few modern adjustments to ensure foolproof results for home cooks. Whether you’re making it for a quick weeknight dinner or to impress guests, this orange chicken will leave everyone asking for seconds.
In this article, we’ll walk through five key parts: the marinade and preparation of the chicken, the crispy coating method, the perfect orange sauce, the frying process, and finally, how to bring it all together for the ultimate meal. Along the way, you’ll also learn cooking science tips that explain why each step matters. Let’s begin by looking at how to prepare the marinade, which sets the foundation for flavorful, tender chicken.
The Marinade – Building Juicy Flavor From the Inside Out
The marinade is the first and perhaps most crucial step in making the best orange chicken recipe. Many home cooks skip this stage, but if you want that restaurant-style texture and taste, it’s absolutely essential. Marinating does more than just season the chicken, it helps tenderize the meat and allows the flavors to penetrate deeply, so every bite bursts with taste.
Why the Marinade Matters
Chicken thighs are the preferred cut for orange chicken because they stay moist and flavorful even after frying. When combined with a thoughtful marinade, the meat absorbs savory, umami-rich notes that complement the tangy orange sauce later on. In this recipe, a combination of egg white, soy sauce, vinegar, baking soda, and cornstarch works together to create magic. The egg white provides a light coating that helps the dry batter cling, while cornstarch contributes to a delicate, crispy finish. Baking soda subtly alters the chicken’s surface texture, making it extra tender once cooked.
Marinade Ingredients You’ll Need
- 1 large egg white
- 2 tablespoons dark soy sauce
- 2 tablespoons white vinegar
- 1/4 teaspoon baking soda
- 3 tablespoons cornstarch
- 1 pound boneless, skinless chicken thighs, cut into bite-sized chunks
Each ingredient here plays a specific role. The soy sauce adds depth and savory umami. The vinegar gives a touch of brightness while also helping to break down proteins in the meat. Cornstarch helps seal in the juices during frying. Taken together, this creates chicken that is succulent inside and crisp outside.
How to Marinate Properly
To prepare the marinade, beat the egg white in a large mixing bowl until lightly foamy. Add soy sauce and vinegar, whisking until smooth. Sprinkle in the baking soda and cornstarch, whisk again, and then add the chicken pieces. Use your hands or a spatula to coat the chicken thoroughly, ensuring each piece is enveloped in the mixture. Cover with plastic wrap and let the chicken rest for at least 20 minutes. This short marinating time is enough to tenderize the meat and infuse it with flavor.
Pro Tip: Timing is Everything
Unlike long marinades for tougher meats like beef or lamb, chicken thighs only need a short soak in this flavorful mixture. Over-marinating can actually break down the texture too much, making the chicken mushy. Aim for 20 to 30 minutes for the best balance of tenderness and flavor.
With your chicken now marinating, you’ve laid the foundation for a dish that will rival your favorite takeout spot. In the next part, we’ll explore how to create the perfect dry coating that ensures maximum crunch when the chicken hits the hot oil.
Print
Best Orange Chicken Recipe
- Total Time: 35 mins
- Yield: 4 to 6 servings
Description
Crispy, juicy chicken tossed in a sweet, tangy, and savory orange sauce. A homemade version of the best orange chicken recipe with tender meat, golden crunch, and vibrant flavor.
Ingredients
For the Marinade:
1 large egg white
2 tablespoons dark soy sauce
2 tablespoons white vinegar
1/4 teaspoon baking soda
3 tablespoons cornstarch
1 pound boneless, skinless chicken thighs, cut into chunks
For the Dry Coating:
1/2 cup all-purpose flour
1/2 cup cornstarch
1/2 teaspoon baking powder
1/2 teaspoon kosher salt
Reserved portion of marinade
For the Sauce:
1 tablespoon dark soy sauce
2 tablespoons white vinegar
3 tablespoons low-sodium chicken stock
4 tablespoons sugar
1 teaspoon roasted sesame seed oil
2 teaspoons grated zest and 1/4 cup fresh orange juice
1 tablespoon cornstarch
4 strips dried orange peel
2 teaspoons peanut, canola, or vegetable oil
2 teaspoons minced garlic (2 cloves)
2 teaspoons minced fresh ginger (1-inch piece)
2 teaspoons thinly sliced scallion bottoms
To Finish:
2 quarts peanut, canola, or vegetable oil for frying
Steamed white rice and broccoli for serving
Instructions
1.
2. Beat egg white until lightly foamy. Add soy sauce and vinegar, whisk, then add baking soda and cornstarch. Coat chicken thoroughly and let marinate 20–30 minutes.
3. In a separate bowl, mix flour, cornstarch, baking powder, and salt. Add reserved marinade and mix until clumpy. Coat marinated chicken pieces thoroughly in the dry mixture.
4. Whisk soy sauce, vinegar, chicken stock, sugar, sesame oil, orange zest, juice, and cornstarch. Stir in dried orange peel.
5. In a skillet, sauté garlic, ginger, and scallions until fragrant. Add the sauce mixture, stir until thickened and glossy, then set aside.
6. Heat oil in a wok or Dutch oven to 350°F (177°C). Fry chicken in batches 3–4 minutes until golden and crispy. Drain on paper towels.
7. Return sauce to skillet, add chicken, and toss until evenly coated.
8. Serve immediately over steamed rice with broccoli, garnished with scallions or sesame seeds.
9.
Notes
Use chicken thighs for the best balance of flavor and tenderness.
Maintain oil temperature between 325°F and 375°F for perfect frying.
If preparing ahead, keep chicken and sauce separate until serving to maintain crispiness.
Homemade dried orange peel adds extra depth, but fresh zest can also be used.
- Prep Time: 15 mins
- Cook Time: 20 mins
- Category: Main Course
- Method: Deep Frying, Stir Fry
- Cuisine: Chinese-American
The Crispy Coating – Creating That Irresistible Crunch
When you think of the best orange chicken recipe, the first image that comes to mind is those golden, crunchy bites coated in a sticky orange glaze. Achieving that satisfying crispiness is not accidental, it’s the result of a carefully balanced coating that clings to the chicken and fries into a shatteringly crisp crust. This is what separates mediocre orange chicken from restaurant-quality results.
The Science Behind the Crunch
The coating mixture in this recipe combines flour, cornstarch, baking powder, and a pinch of salt. Each element has an important role. Flour provides structure, cornstarch ensures crispiness, baking powder adds lightness by creating tiny air bubbles, and salt enhances flavor. Together, they form a dry coating that puffs slightly when fried, producing that desirable crunchy shell.
Unlike a simple batter, this method uses what’s often called a “slurry-to-dry dredge technique.” Here’s how it works: part of the marinade is mixed into the dry coating to create small, clumpy bits. These mealy clumps cling to the chicken, giving it extra texture. Once fried, the result is a crust with ridges and crags that hold onto the orange sauce beautifully.
Ingredients for the Dry Coating
- 1/2 cup all-purpose flour
- 1/2 cup cornstarch
- 1/2 teaspoon baking powder
- 1/2 teaspoon kosher salt
- Reserved portion of the marinade
This combination might seem simple, but the magic lies in how you handle it. By adding some of the marinade to the dry mix, you create a rough, lumpy texture. Those irregularities become crispy golden edges once fried, making the chicken extra crunchy.
Step-by-Step Coating Method
- In a large bowl, whisk together the flour, cornstarch, baking powder, and salt until evenly combined.
- Pour in the reserved marinade and whisk until the mixture forms coarse, clumpy bits. You don’t want a smooth paste, the goal is to have small crumbles that will stick to the chicken.
- Working one piece at a time, transfer the marinated chicken into the coating mixture. Toss the pieces around, pressing the coating firmly so that every piece is well covered. The more irregular and clumpy the coating looks at this stage, the crispier the final result will be.
Pro Tip: Double Coating for Extra Crunch
If you’re looking for an extra layer of crispiness, you can repeat the coating step once more. After coating the chicken once, let it rest for a few minutes, then dip each piece lightly back into the dry mixture. This double-coating method is especially useful if you plan to toss the chicken in sauce ahead of serving, as it helps the crust stay crisp longer.
Common Mistakes to Avoid
- Over-mixing the coating: A smooth batter will lead to a dense, soggy crust. Keep the clumps intact.
- Skipping the salt: Even though the sauce is flavorful, seasoning the coating is essential. Salt enhances the overall taste and ensures the chicken isn’t bland once fried.
- Not pressing the coating: Simply tossing the chicken in flour is not enough. Pressing ensures the crust adheres and won’t fall off during frying.
By the time your chicken is coated, you’ll notice that the pieces look rough and slightly messy.
The Orange Sauce – Sweet, Tangy, and Packed With Flavor
No matter how crispy the chicken turns out, the dish would not be complete without its iconic orange sauce. This sauce is what transforms fried chicken bites into the best orange chicken recipe you’ll ever taste. A perfect sauce should be glossy, cling to every piece, and deliver a balanced punch of sweet, sour, and savory notes with a hint of citrus.
Building Layers of Flavor
The sauce combines several key ingredients, each contributing to the overall depth. Soy sauce adds salty umami richness, vinegar provides brightness, chicken stock creates body, and sugar balances the acidity. Toasted sesame oil introduces a nutty aroma, while fresh orange zest and juice give the sauce its signature citrus punch. When all these elements come together, the flavor is vibrant yet harmonious.
Ingredients for the Sauce
- 1 tablespoon dark soy sauce
- 2 tablespoons white vinegar
- 3 tablespoons low-sodium chicken stock
- 4 tablespoons sugar
- 1 teaspoon roasted sesame seed oil
- 2 teaspoons grated zest and 1/4 cup fresh orange juice
- 1 tablespoon cornstarch
- 4 strips dried orange peel
- 2 teaspoons peanut, vegetable, or canola oil
- 2 teaspoons minced garlic (about 2 cloves)
- 2 teaspoons minced fresh ginger (about 1-inch piece)
- 2 teaspoons thinly sliced scallion bottoms
This combination ensures a sauce that is both bold and refreshing. The orange zest and juice are the star players here, but the ginger and garlic add warmth, while scallions give a mild, onion-like sharpness.
Cooking the Sauce the Right Way
Start by whisking together soy sauce, vinegar, chicken stock, sugar, sesame oil, orange zest, juice, and cornstarch in a bowl until smooth. The cornstarch is crucial because it thickens the sauce, allowing it to coat the chicken instead of pooling at the bottom of the dish. Add dried orange peel for extra fragrance.
In a large skillet, heat the oil over medium heat and sauté the garlic, ginger, and scallions until fragrant but not browned. This step develops a deep aromatic base. Stir in the prepared sauce mixture, making sure to scrape the bottom of the skillet to prevent lumps. Bring it to a gentle boil, stirring constantly, until the sauce thickens and turns glossy. Transfer it to a bowl to stop the cooking process.
Pro Tip: Balancing the Sweet and Sour
Every palate is different, so taste the sauce before finishing. If it’s too sweet, add a splash more vinegar. If it feels too sharp, sprinkle in a little extra sugar or chicken stock. Customizing the balance ensures the sauce perfectly matches your preferences.
The Secret Role of Dried Orange Peel
Many recipes skip this step, but dried orange peel adds an extra depth of citrus flavor that fresh zest alone can’t replicate. It provides a subtle bitterness that balances the sweetness of the sugar. If you don’t have access to dried peel, you can easily make your own at home by baking strips of orange skin at a low temperature until dry.
At this stage, your kitchen will already be filled with the enticing aroma of garlic, ginger, and oranges. But the best is yet to come, because next we’ll focus on the frying process, the step that gives the chicken its signature crunch and golden perfection.
The Frying Process – Achieving Golden Perfection
If there’s one step that can make or break the best orange chicken recipe, it’s frying. The coating and marinade set the stage, but frying is where texture and taste truly come alive. Done correctly, frying transforms coated chicken pieces into crispy golden bites that are light yet sturdy enough to hold up to the sauce.
Choosing the Right Oil
The choice of oil is more important than many realize. Oils with high smoke points such as peanut, canola, or vegetable oil are best because they can withstand the high temperatures required for deep frying without burning or imparting unwanted flavors. Peanut oil is often favored for its subtle nutty undertone, but canola and vegetable oil are excellent alternatives.
Oil Temperature Control
The key to crispy chicken lies in maintaining the right oil temperature. Heat your oil in a wok or Dutch oven to about 350°F (177°C). If the temperature drops too low, the coating absorbs excess oil and turns greasy. If it climbs too high, the outside burns before the chicken cooks through. A reliable kitchen thermometer is the best tool for this job, but you can also test by dropping in a small piece of coating, it should sizzle immediately and rise to the top within seconds.
Frying Step-by-Step
- Line a bowl or tray with paper towels to drain excess oil later.
- Working one piece at a time, shake off excess coating from the chicken before gently lowering it into the hot oil. Avoid overcrowding the pan, as this reduces the temperature quickly.
- Fry in small batches, agitating the chicken pieces with long chopsticks or a spider strainer to prevent sticking. Maintain the oil temperature between 325°F and 375°F (163-190°C).
- After about 4 minutes, the chicken should be golden brown and crisp. Transfer to the prepared paper towel-lined bowl.
Pro Tip: Double Fry for Extra Crispness
For a crunch that stays crisp even after saucing, consider double frying. After the first fry, let the chicken rest for a few minutes. Increase the oil temperature slightly and fry the pieces again for 30 to 60 seconds until darker golden. This technique is often used in Asian cooking to ensure long-lasting crispiness.
Common Mistakes to Avoid
- Overcrowding the pan: This leads to soggy chicken because the oil temperature drops too much.
- Skipping the rest after frying: Letting the chicken drain helps preserve crunch and prevents excess oiliness.
- Uneven sizes of chicken pieces: Uniform chunks ensure that all pieces cook at the same rate.
The Reward of Perfect Frying
When done correctly, your fried chicken will look golden, crisp, and slightly rough in texture. Bite into a piece, and you should hear an audible crunch before reaching juicy, tender chicken inside. This crispy fried chicken is delicious on its own, but its true potential shines when paired with the flavorful orange sauce.
Next, we’ll move on to the final stage, where the crispy chicken and tangy sauce come together in one harmonious dish. This is where the magic happens.
Bringing It All Together – The Perfect Orange Chicken
With your chicken fried to golden perfection and the orange sauce rich, glossy, and fragrant, it’s time to unite the two into one irresistible dish. This final stage is where texture meets flavor, and every element you’ve prepared works together to create the best orange chicken recipe.
Tossing the Chicken in Sauce
Start by reheating the orange sauce in the same skillet you used earlier for sautéing the aromatics. Once it begins to bubble gently, add the fried chicken pieces. Use a rubber spatula or large spoon to fold the chicken into the sauce, making sure each piece is thoroughly coated. The crispy ridges and rough coating you developed earlier are perfect for grabbing onto the sauce, ensuring no bite is bland.
The Ideal Sauce-to-Chicken Ratio
One common mistake is drowning the chicken in sauce, which makes it soggy. The goal is to lightly coat the pieces so that the crunch remains intact while still delivering a strong orange flavor. Think of the sauce as a glaze rather than a pool. A proper balance keeps the texture crisp while highlighting the tangy sweetness.
Serving Suggestions
Orange chicken is best enjoyed immediately while the coating is still crisp and the sauce is glossy. Serve it over steamed white rice to soak up any extra sauce, and pair with steamed broccoli for a fresh, slightly bitter contrast to the sweetness of the dish. This classic trio not only looks beautiful on the plate but also provides a balanced meal.
For those who prefer variety, jasmine rice, fried rice, or even noodles can be served alongside. The mild flavors of these starches allow the orange chicken to remain the star of the meal.
Pro Tips for Success
- Serve hot: Orange chicken loses its crispness as it cools, so serve it right away for the best texture.
- Batch reheating: If making in advance, keep the chicken and sauce separate until serving. Reheat the chicken in the oven to restore crispiness, then toss in freshly warmed sauce.
- Garnish wisely: A sprinkle of sesame seeds or thinly sliced scallions on top adds a touch of freshness and visual appeal.
Why This Recipe Works
This recipe succeeds because it balances three key elements: tender, juicy chicken, a crispy coating, and a bold, tangy sauce. Each step was designed to preserve texture and maximize flavor. The marinade tenderizes and seasons the meat, the coating creates crunch, frying locks in juiciness, and the sauce ties everything together. When combined, you get a dish that rivals restaurant quality, yet is achievable in a home kitchen.
Now that the dish is complete, it’s time to look at the final touches and a summary of what makes this recipe so memorable.
Conclusion: Why This Is the Best Orange Chicken Recipe
Orange chicken is more than just a takeout favorite, it’s a dish that embodies the perfect balance of crispy textures and bold flavors. By carefully marinating the chicken, coating it for maximum crunch, frying it at the right temperature, and finishing it with a glossy orange sauce, you create a meal that feels both comforting and exciting. Each step contributes to the final harmony of sweet, tangy, savory, and citrusy notes, making every bite unforgettable.
This recipe proves that restaurant-quality orange chicken is entirely achievable at home with the right techniques. The chicken remains juicy inside while crisp outside, and the sauce clings beautifully without overwhelming. Served with rice and broccoli, it becomes a complete meal that is satisfying and crowd-pleasing.
Whether you’re cooking for family, friends, or simply treating yourself, this dish delivers consistency, flavor, and a touch of homemade pride. Once you master this method, you’ll find yourself coming back to it again and again, refining it to your taste and making it your own signature version.