Pancake Board (From‑Scratch Pancakes + Toppings) is the ultimate brunch spread that turns ordinary pancakes into a fun build‑your‑own experience. Whether you’re hosting friends or treating your family on a weekend, this concept delivers both flavour and visual appeal. Using fluffy from‑scratch buttermilk pancakes, fresh berries, mini chocolate chips, whipped cream, sliced bananas, peanut butter, hazelnut spread and real maple syrup, this board invites everyone to design stack after stack of deliciousness. With the right preparation and presentation you’ll create an inviting breakfast or brunch board that’s easy to share and enjoy together.
Preparing the Pancake Base
Choosing the Right Batter Ingredients
When you start building your Pancake Board (From‑Scratch Pancakes + Toppings) it all begins with the batter. For from‑scratch pancakes aim for buttermilk, flour, baking powder, baking soda, sugar, eggs and melted butter. This combination gives you a tender, fluffy stack that holds toppings well and won’t go soggy when arranged on a board. Using buttermilk adds tang and improves texture — many classic pancake‑board recipes use a buttermilk base. (Modern Honey)
To maintain consistency for a board serving eight, scale the recipe to yield about eighteen pancakes — a moderate size so each topping section can shine on the board.
Cooking and Keeping Warm for Serving
Once your batter is ready, cook the pancakes on a pre‑heated griddle or non‑stick pan to achieve golden edges and soft interior. As recommended in similar pancake board setups, keep cooked pancakes warm in a low oven (around 200 °F) until you are ready to assemble. (Completely Delicious)
This step ensures all pancakes stay warm when the toppings are arranged and you’re ready to serve. Stacking too soon or letting pancakes cool can result in loss of texture and warm comfort.
Assembling the Board Layout
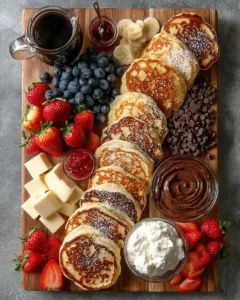
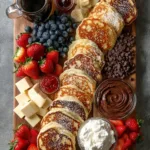
With your pancakes ready and warm, it’s time to arrange the board for the Pancake Board (From‑Scratch Pancakes + Toppings) presentation. Choose a large wooden or marble board so you have room for the pancakes and toppings. Many sources suggest leaving a clear path down the centre for the pancake stack, with toppings arranged around it. (The BakerMama)
Begin by placing the pancakes down the middle. Then around the periphery arrange sections of fruit (raspberries, strawberries, blueberries, bananas), spreads (peanut butter, hazelnut spread), butter pats, syrup and mini chocolate chips. The segmented layout allows each person to build their own stack and choose their favoured combo of toppings on the Pancake Board (From‑Scratch Pancakes + Toppings).
Tips for Best Results
- Make sure pancakes are similar size so your board looks coordinated and toppings are easy to reach.
- Use small jars or bowls for spreads (e.g., peanut butter, hazelnut spread, maple syrup) rather than spooning directly from large containers — this keeps the board tidy.
- Arrange toppings that might melt or brown (like bananas) just before serving so everything looks fresh.
- Keep hot elements like pancakes warm in the oven while you build the board so the overall experience stays warm and inviting.
Pancake Board (From‑Scratch Pancakes + Toppings)
- Total Time: 50 minutes
- Yield: 8 servings
Description
This pancake board is a fun, customizable brunch idea loaded with fluffy pancakes, fresh fruit, creamy spreads. Perfect for sharing.
Ingredients
About 18 buttermilk pancakes
¾ cup raspberries
¾ cup sliced strawberries
1 cup blueberries
½ cup mini chocolate chips
1 cup whipped cream
2 bananas, peeled and sliced
½ cup salted butter, sliced into small pats (1 stick)
¼ cup peanut butter
¼ cup hazelnut spread
1 cup real maple syrup
Instructions
1. Keep the pancakes warm in a 200°F oven until ready to serve.
2. Arrange all toppings on a large board, leaving a clear space down the middle for the pancakes.
3. Keep spreads like peanut butter, hazelnut spread, and maple syrup in jars or small bowls for easy serving.
4. Add the warm pancakes to the center of the board when ready to serve.
5. Peel and slice bananas just before serving to keep them fresh.
6. Serve immediately and let everyone build their own perfect pancake stack.
Notes
Make pancakes slightly smaller (4–5 inches) so guests can try different topping combinations.
Slice bananas and strawberries just before serving to keep them fresh.
Use small jars or bowls for neat presentation of spreads and syrups.
Layer pancakes with wax paper if making ahead.
Store leftover pancakes in the fridge for up to 3 days or freeze for up to 2 months.
Reheat in toaster, oven, or microwave until warm.
- Prep Time: 20 minutes
- Cook Time: 30 minutes
- Category: Breakfast
- Method: Assembled
- Cuisine: American
Tips and Tricks to Elevate Your Pancake Board
Use variety in toppings
The charm of a pancake board lies in the options. Alongside standard toppings like maple syrup, peanut butter, and hazelnut spread, include textures and colors for visual interest. Use a mix of soft fruit like bananas and berries with crunchier additions like granola, crushed nuts, or mini chocolate chips.
Balance sweet and savory
While fruit and syrup bring natural sweetness, offering savory sides helps cater to different taste preferences. Butter pats can be placed in sections for melting over warm pancakes, and a small dish of whipped cream adds a soft, creamy contrast.
Choose spreads with care
For your hazelnut spread, select alcohol-free options that still bring that creamy, chocolate-hazelnut flavor. Brands like Simply Organic Alcohol-Free Vanilla Flavor or Watkins Clear Vanilla Flavor ensure your spreads remain family-friendly. Peanut butter should be smooth and scoopable, making it easy to drizzle or spread.
Keep the board fresh and photogenic
Slice bananas and strawberries right before serving to prevent browning. Lay the fruit in small clusters for easy grabbing. Use berries to add bursts of color, and fill any gaps with fresh herbs like mint or extra fruit to make your board look full and abundant.
Use the right board
Wooden boards work well, but so do slate or marble for a modern look. The board should be large enough to fit 18 pancakes, toppings, and a variety of fruit. Boards with lips or slight edges help prevent syrup and spreads from dripping over the sides.
Build in layers
Layer pancakes with wax paper if stacking in advance. Arrange toppings in groups that flow naturally – fruits together, spreads in jars, crunchy elements grouped. This layout creates a natural rhythm for guests to follow as they build their perfect pancake plate.
Notes for a Flawless Pancake Board
Prep in advance where possible
Many elements of your pancake board can be prepped ahead of time. You can wash and slice berries the night before and store them in airtight containers. Whipped cream can be whipped and refrigerated for several hours. Pancake batter can be mixed and chilled, then brought to room temperature before cooking. This helps streamline the process on the day of serving.
Control portion sizes
Since this board is meant for sharing, consider making the pancakes slightly smaller than traditional sizes. About 4–5 inches in diameter is ideal. Smaller pancakes allow guests to build multiple stacks and try different topping combinations without becoming too full too fast.
Create a color palette
Visually appealing boards tend to follow a color theme. Stick to fresh reds, deep blues, soft whites, and warm golden browns. These tones not only complement each other visually, but they also naturally reflect common pancake toppings like strawberries, blueberries, whipped cream, and golden pancakes.
Avoid soggy elements
Keep wet fruits like sliced bananas or juicy strawberries from touching the pancakes directly, especially if they’ll sit for a while. Use small bowls or parchment dividers if necessary. This keeps everything fresh and prevents sogginess.
Label spreads for clarity
If you’re hosting guests or kids, labeling the spreads like peanut butter, hazelnut spread, and syrups can be helpful. This avoids mix-ups and keeps things moving smoothly during self-serve. Small chalkboard signs or tags clipped onto bowls do the trick.
Temperature matters
Make sure the pancakes are still warm when served. Use your oven’s warming drawer or a low-temperature oven to hold them while you finish assembling the rest of the board. Serve spreads at room temperature for easy scooping and spreading.
Storage and Make-Ahead Tips
Storing leftover pancakes
If you have extra pancakes after serving, let them cool completely before storing. Place a piece of parchment or wax paper between each pancake to prevent sticking, then seal in an airtight container or zip-top bag. They’ll stay fresh in the refrigerator for up to 3 days. For longer storage, freeze them — they can last up to 2 months. Reheat in the toaster, oven, or microwave until warm.
Keeping toppings fresh
Fruits like strawberries, blueberries, and raspberries should be stored separately in airtight containers in the fridge. Bananas, once sliced, are best enjoyed fresh, but if you must store them, coat lightly with lemon juice to reduce browning and store in a sealed container for 1 day.
Mini chocolate chips, peanut butter, hazelnut spread, and maple syrup can be returned to their original containers or transferred to small jars with lids. Keep them in a cool, dry place or refrigerate as needed based on the label instructions.
Handling whipped cream
If using homemade whipped cream, store any leftovers in a tightly sealed container in the fridge. It’s best consumed within 1–2 days. Whisk gently before re-serving if it separates slightly.
Make-ahead planning for ease
To prepare ahead, mix the dry ingredients of your pancake batter the night before and store in a bowl with a lid or tightly wrapped. Wash and dry fruits in advance, but slice only right before serving to keep textures fresh. Cook the pancakes the morning of and hold in a 200°F oven while you build the board.
Quick reheating tips
For pancakes stored in the fridge, reheat in the microwave covered with a damp paper towel, or toast in a dry skillet or toaster oven. Avoid overcooking as it can dry them out. Spreads should be brought to room temperature before serving to ensure they spread easily across the warm pancakes.
Conclusion
A Pancake Board (From-Scratch Pancakes + Toppings) offers a creative and interactive way to serve breakfast that’s as visually impressive as it is delicious. By focusing on fresh ingredients, balanced flavors, and thoughtful presentation, you can turn a simple breakfast into a memorable spread for any gathering. Whether you’re serving a crowd or just a cozy group, the flexibility and fun of building your own pancake stack make this board a crowd-pleaser every time.