There’s something timeless and heartwarming about a classic baked chicken recipe. Whether you’re cooking for your family on a weeknight or preparing a comforting Sunday dinner, this dish always hits the right spot. It’s a simple, no-fuss meal that delivers juicy meat, crispy skin, and rich flavors with minimal ingredients. In this article, you’ll discover how to perfect baked chicken at home using the most essential tips and techniques. From prep to presentation, this is your go-to guide for deliciously baked chicken every single time.
Choosing the Right Chicken and Prep Techniques
Why the Cut of Chicken Matters
When it comes to a classic baked chicken recipe, selecting the right cuts makes a noticeable difference in flavor and texture. A whole chicken cut into parts—two breasts, two thighs, two legs, and two wings—is ideal. This ensures each piece cooks evenly while giving you a variety of textures from juicy white meat to flavorful dark meat.
Using bone-in, skin-on pieces helps retain moisture during baking and enhances the flavor. Avoid skinless cuts if you’re aiming for a golden, crispy exterior.
How to Properly Trim and Season Chicken
Before baking, it’s crucial to trim any excess fat from the chicken. Then, pat each piece dry using a paper towel. This step removes excess moisture, allowing the skin to crisp up beautifully in the oven.
Next, season the chicken generously with kosher salt. Letting the seasoned chicken sit for 15 to 20 minutes not only brings it to room temperature, helping it cook more evenly, but also allows the salt to penetrate and enhance the flavor of the meat.
The Role of Olive Oil and Simple Spices
Extra virgin olive oil does more than add a subtle richness. Rubbing oil over each piece helps the skin crisp in the oven while keeping the meat moist. Freshly ground black pepper adds a mild kick that complements the chicken’s natural flavor without overpowering it.
Keep your seasoning minimal. This dish proves that simple ingredients can deliver big on taste. You don’t need elaborate rubs or marinades—just quality chicken, olive oil, salt, and pepper.
Print
Classic Baked Chicken Recipe
- Total Time: 65 mins
- Yield: 4 servings
Description
This classic baked chicken recipe is the ultimate go-to for juicy, flavorful meat with a crispy golden skin. It’s easy, comforting, and perfect for any dinner table.
Ingredients
1 (3 to 4-pound) whole chicken, cut into 8 parts (2 breasts, 2 thighs, 2 legs, 2 wings)
Extra virgin olive oil
Kosher salt
Freshly ground black pepper
1/2 cup low sodium chicken stock (for optional gravy)
Instructions
1. Trim excess fat from chicken and pat pieces dry with a paper towel.
2. Sprinkle all sides with kosher salt and let sit for 15 to 20 minutes at room temperature.
3. Preheat oven to 400°F (205°C).
4. Rub chicken pieces with olive oil and lightly oil the bottom of a roasting pan.
5. Sprinkle chicken with black pepper and a little more salt.
6. Arrange chicken skin-side up in the pan, placing breasts in the center. Leave space between each piece.
7. Bake uncovered for 30 minutes at 400°F (205°C).
8. Reduce oven to 350°F (175°C) and bake for an additional 10 to 30 minutes until internal temps reach 165°F for breasts and 170°F for thighs.
9. If needed, broil for the last 5 minutes for extra browning.
10. Remove from oven, transfer to serving dish, and tent loosely with foil. Let rest 5 to 10 minutes.
11. (Optional) To make gravy, place roasting pan over medium heat. Add chicken stock and scrape up pan drippings.
12. Transfer to a saucepan and simmer to reduce. Thicken with cornstarch slurry if desired.
13. Serve with mashed potatoes, steamed rice, or Spanish rice.
Notes
Leave the skin on while baking, even if you plan to remove it later. The skin helps prevent the chicken from drying out during cooking.
- Prep Time: 15 mins
- Cook Time: 50 mins
- Category: Dinner
- Method: Baking
- Cuisine: American
Oven Baking Techniques for Perfect Texture
Preheating and Temperature Control
A perfectly baked chicken starts with proper oven management. Preheat your oven to 400°F (205°C) before placing the chicken inside. This initial high temperature jumpstarts the browning process, giving the skin that irresistible golden crisp.
After the first 30 minutes at 400°F, reduce the oven temperature to 350°F (175°C) to let the chicken cook through gently without drying out. This two-stage baking method locks in juices and prevents overcooking.
It’s important not to crowd the pan. Leave space between each piece so that hot air circulates evenly around the chicken. This spacing helps all the pieces brown well and cook uniformly.
Time and Temperature Guidelines by Piece
Use a meat thermometer for precision. Chicken breasts should reach 165°F (74°C) at their thickest point, while thighs should hit 170°F (77°C). These temperatures ensure safety and perfect juiciness.
Depending on your oven and the size of the pieces, total baking time ranges from 40 to 60 minutes. If you’re noticing uneven browning toward the end, place the pan under the broiler for the final 5 minutes. Watch carefully to avoid burning.
Pan Setup for Best Results
Use a metal or heavy-duty roasting pan for even heat distribution. Avoid glass pans, which don’t promote browning as effectively.
Before placing the chicken in the pan, rub the bottom with olive oil. This prevents sticking and helps create rich, flavorful pan drippings that are perfect for gravy. Arrange the largest pieces, like breasts, in the center of the pan where heat is more intense, and place smaller pieces toward the edges.
Resting and Serving for Maximum Flavor
Why Resting the Chicken Matters
As tempting as it is to dive in right after baking, letting the chicken rest is one of the most important steps in a classic baked chicken recipe. Resting allows the juices to redistribute throughout the meat, keeping every bite tender and flavorful instead of dry and uneven.
Once you remove the chicken from the oven, transfer the pieces to a serving dish and tent them loosely with aluminum foil. Let them rest for 5 to 10 minutes. This short waiting period makes a noticeable difference in texture and taste.
Skipping this step often leads to dry chicken, especially in the breasts, as the juices escape too quickly when sliced hot.
Best Side Dishes to Serve with Baked Chicken
A meal is only as satisfying as its accompaniments. Luckily, baked chicken pairs beautifully with a range of classic side dishes.
Here are some popular options to elevate your dinner table:
| Side Dish | Description |
|---|---|
| Mashed Potatoes | Creamy and smooth, ideal for soaking up chicken gravy |
| Steamed Rice | A neutral base that balances savory chicken juices |
| Spanish Rice | Adds a seasoned, slightly tangy twist |
| Roasted Veggies | Carrots, potatoes, or green beans roasted alongside |
| Cornbread | Offers a sweet, soft contrast to savory flavors |
Choose one or two based on the mood of your meal—comforting and hearty, or light and balanced.
Presentation Tips for a Homestyle Look
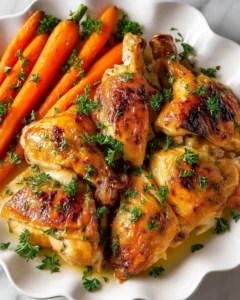
When serving baked chicken, keep it rustic. Use a large platter and arrange pieces skin-side up, highlighting that beautiful, golden finish. If you’ve made gravy, drizzle a little over the chicken before serving and place the rest in a small gravy boat on the side.
Garnish with a sprinkle of fresh parsley or thyme for color. Simple touches like this add visual appeal without complicating the recipe.
Making the Most of Pan Drippings with Easy Homemade Gravy
Collecting and Using Chicken Drippings
One of the unsung heroes of any classic baked chicken recipe is the flavorful liquid gold left in the roasting pan — the drippings. These rich juices contain concentrated flavor from both the chicken and the seasoning, making them perfect for a simple, hearty gravy.
After baking, remove the chicken from the roasting pan and set it aside to rest. Then, place the pan directly on the stovetop over medium heat. Use a metal spatula to scrape up the browned bits from the bottom — these are packed with umami.
Next, pour in ½ cup of low-sodium chicken stock to deglaze the pan. As the liquid heats, stir and loosen all those flavorful bits. This mixture forms the base of your homemade gravy.
How to Thicken Gravy the Right Way
If you prefer a thicker gravy, transfer the pan drippings and stock to a small saucepan and bring it to a gentle simmer. From here, you have two simple thickening options:
- Reduce Naturally
Continue simmering the liquid for several minutes until it reaches your desired consistency. - Use a Slurry
For a quicker method, mix 1 teaspoon of cornstarch or all-purpose flour with ¼ cup of water. Stir until smooth, then slowly add it to the simmering gravy while whisking continuously.
Cook for a few more minutes until the gravy thickens. Taste and adjust seasoning if needed, though it often needs little more than what’s already in the drippings.
Serving Ideas with Gravy
Homemade gravy pairs perfectly with mashed potatoes and rice. You can also drizzle it lightly over the chicken or serve it on the side. For a rustic presentation, place the gravy in a small bowl or gravy boat with a ladle. This gives your table a welcoming, home-cooked feel.
Gravy not only boosts flavor, but it also ties the entire meal together, making it richer and more satisfying.
Pro Tips for Juicy, Flavorful Baked Chicken Every Time
Why Skin-On Chicken Is Non-Negotiable
Even if you’re planning to eat the chicken without the skin, it’s still important to bake it with the skin on. The skin serves as a natural barrier that keeps the moisture inside the meat. During baking, it also crisps up and adds that classic golden finish.
Removing the skin before baking often leads to drier, tougher meat, especially in the breast pieces. So, keep the skin on during cooking, and simply remove it at the table if desired.
How to Avoid Common Baking Mistakes
Even with a simple recipe, small errors can affect your results. Here are a few pitfalls to watch for:
| Mistake | Fix It Tip |
|---|---|
| Baking cold chicken straight from the fridge | Let it sit for 15–20 minutes at room temperature before cooking |
| Not patting chicken dry | Moisture on the surface prevents browning |
| Overcrowding the pan | Always leave space between pieces to allow proper air flow |
| Skipping the thermometer | Always check internal temperature for safe, juicy chicken |
One overlooked mistake is forgetting to check both the thickest parts of the breast and thigh. Since these parts cook at different rates, using a meat thermometer helps you avoid overcooking.
Enhancing Flavor Without Overpowering
You don’t need fancy herbs or strong spices to bring out the best in baked chicken. A light rub of extra virgin olive oil, plus salt and pepper, allows the chicken’s natural flavor to shine.
If you want subtle flavor upgrades, consider adding garlic powder, onion powder, or smoked paprika in small amounts. These blend seamlessly with the base seasoning and offer depth without changing the recipe’s classic profile.
For an extra touch, place a few sprigs of fresh rosemary or thyme in the pan as the chicken bakes. It infuses a gentle aroma that complements the chicken beautifully.
Conclusion: Bring Home Comfort with a Classic Baked Chicken Recipe
A well-executed classic baked chicken recipe is more than just a meal — it’s a return to comfort, simplicity, and wholesome flavor. With just a few ingredients, some mindful preparation, and the right oven technique, you can transform an everyday chicken into a deeply satisfying dish that the whole family will love.
By focusing on essential steps like proper seasoning, managing oven temperature, and letting the chicken rest, you’ll enjoy juicy meat with perfectly crisp skin every single time. Whether you serve it with mashed potatoes, steamed rice, or your favorite side, baked chicken fits any occasion — from casual weeknights to special dinners.
And don’t overlook the homemade gravy. With just the pan drippings and a splash of chicken stock, you can create a savory sauce that ties the whole meal together without adding complexity.
Remember, the beauty of this dish lies in its simplicity. No need for heavy seasoning or complicated marinades — just quality ingredients, careful handling, and a little patience.
Ready to turn your kitchen into a hub of timeless flavor? Keep this recipe close, and you’ll never need to wonder what to make for dinner again.